Adventures in Stripping
I've never painted a Trad scale custom before, so a while ago I picked up a Giselle custom which was described as having been heat damaged and gone a little sticky. In the time she's been in my body box, this problem has only gotten worse. I felt bad destroying someone else's work but if she was ever going to look like a proper horse again, the sticky paint job had to be removed!
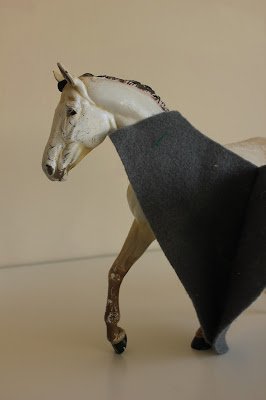
As you can see, she was so sticky that when I took her out of the "projects" box, a rug template had become stuck to her. Besides this, the bubblewrap she had been stored in before had left bubble prints all over her.
The first product I tried was nail polish remover on a cotton pad. This quickly strips original Breyer paint jobs but didn't have much impact on the sticky paint. Don't try leaving it on for longer either; important stripping lesson #1 is that ACETONE MELTS BREYERS. See her near-side hind foot? I left it to soak in nail polish remover as my second evil genius experiment. It went all soft (once out of the nail polish remover it hardened up again) and on close inspection you can see it's now less well defined.
The second product I tried was isopropyl alcohol. Some people use this to help with dappling techniques and it is a fairly common cleaning solvent. Although it's reasonably good at both of these things, it's not really useful for removing thick, sticky residue.
Thirdly, I decided to try oven cleaner, which I'd seen people discussing on some Facebook groups. It's more expensive than the above products at about £6 per kit, but here's the good news - it works! I documented the process to help anyone else with the same problem.
Major disclaimer: The products I'm using in this post can be harmful. ALWAYS follow the instructions, wear appropriate protective gear and if you are under 14 please get a grown up to help you - or at least let them know what you are doing! I am also NOT a chemist, so can't advise on the long term effects of chemicals on plastics etc. A general important point is not to MIX any of these chemicals as you might make something even nastier and breath it in. Last of all, the results I get on Breyer plastic are not necessarily transferable to other sorts of models; isopropyl alcohol actually dissolves some resins I believe, so always test carefully. Please be sensible and don't get hurt or upset stripping!
Having told you to follow the instructions, we're going to break one rule: "DO NOT use contents for any other purpose than as directed." But we are going to wear gloves, eye protection and scruffy old clothes! (In my case: too small t-shirt with a picture of a cat on it. So old, Tom asked if it was new.)
With this kit, a bag is provided for your oven shelves. I rolled the top right back so I could keep the horse and the liquid in one corner to start with, rather than spread the cleaning fluid all over the bag where it wouldn't actually act on the horse.
The instructions are simple - add the oven shelves horse to the bag and add 1/2 to 3/4 of the liquid. Seal the bag up and leave for "at least four hours, preferably overnight".
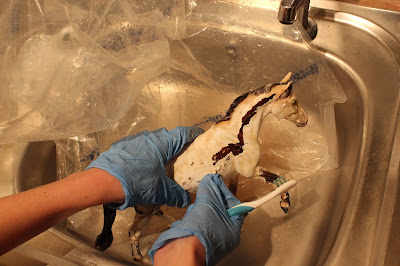
I turned the bag over about once an hour for about ten hours. After about four hours I added the rest of the mixture as it was seeping around the bag and not always covering the horse as well as it could. Towards the end of the time I noticed pieces of the paint starting to sheet off where the body touched the bag. I decided it was time to see if some abrasion could get the rest of it off too! As instructed I rolled back the bag so I didn't need to reach into it and get the chemicals on my arms. And sure enough, the paint began to peel easily.
At this point the instructions called for warm soapy water. I also used an old toothbrush and wooden barbecue skewers to peel and rub off as much paint as possible. Another important lesson: PEEL OFF AS MUCH AS YOU CAN at this stage! Anything you leave on the horse will start to go tacky again with time and exposure to air. I also upgraded to better gloves because the other ones were slipping down and not protecting my arms.
I then left our victim to dry overnight - upside down, so water could come out of the hole in her muzzle and not lead to sticky gunk inside the horse to replace that on the outside.
Here's how she looked the next day:
Once again, I used point barbecue skewers to get into nooks and crannies and remove the last bits of paint job (eg. far side hind leg, croup). Throughout I had tried to avoid using my fingernails but roughly scraping at these tough patches on her back were the only way to get them shifted! They didn't want to peel before and they certainly didn't now. But brute force fixed them in the end...
As you could still see the bubblewrap prints and her paint was in (understandably) patchy condition, I then sanded down with 400 grit sand paper to get her a bit smoother. (Note I alternated between paint removal and sanding, so her croup is still messed up in the photo below.)
And here we are! Now she's finally ready to be sanded and prepped properly, and I will update once I've delved into the work of traditional customising. Hope someone finds the oven cleaner technique useful and thanks for reading!


Comments
Post a Comment